Friday, May 11, 2012

Installing Ruby on Rails on Ubuntu

So finally, after having waited in my to-do list for reasonably long time, Ruby and Rails is installed on my Ubuntu 12.04 (the proven, practical and precise OS). Yes, I did a fresh install of Ubuntu 12 after the upgrade from Ubuntu 11 rendered the OS respond slow (Ubuntu team, are you reading this?). But, I am more excited about Ruby on Rails. If you haven't heard of it yet, you need to catch up. Visit its homepage here.

This post is going to talk about installing Ruby on Rails (I will call it Rails henceforth going by the common term) which can be a real pain at times. And sadly, there are not many good documentation out there on it.

During my writing of this blog, the current versions I used are Ruby 1.9.3 and Rails 3.2.3. This post shows how to install Ruby, Rails and finally the Bundler using RVM (Ruby Version Manager). However, there is a simple way to install the entire package called the Railsready script that installs all the required packages at one go, and is quite simple. I wanted to get into the nitty-gritties! ;)

You need to do some checks first:
  1. You need to make sure you have sudo access to the system.
  2. We will not be using apt-get for the installations. Its outdated and can be quite problematic when installing Rails. Instead, we will use aptitude.
Step 1: Check if aptitude is installed in your system
Type the following command in the terminal.
$ sudo aptitude
in the terminal, and it should open the a visual interface. If you get errors, you have to install aptitude by executing the following commans.
$ sudo apt-get update
$ sudo apt-get upgrade
4 sudo apt-get install aptitude

Step 2: Update the libraries
You should update the libraries to make sure you have all the latest ones. This can save you from quite some trouble due to missing libraries during installation.
$ sudo aptitude update
$ sudo aptitude upgrade
Upgrade will take quite some time. Grab a coffee!

Step 3: Install Git and Curl
Since we will be using RVM (Ruby Version Manager), we need to install Git and Curl, if we do not already have them. Git is the source control repository (as you might know by the GitHub fame) nd Curl is a command line tool to get data from a URL.
$ sudo aptitude install build-essential git-core curl

Step 4: Install Ruby Version Manager
Ruby Version Manager (RVM) is very helpful to manage different versions of Ruby on a system. Using RVM is highly recommended (by me!).

To geth the RVM files to our system, we execute the following command at the bash shell.
$ bash < <(curl -s https://rvm.beginrescueend.com/install/rvm)
Instead of the above command, you can also type:
$ curl -L get.rvm.io  | bash -s stable

Step 5: Make RVM load with terminal
To make RVM load itself everytime we open the terminal, we need to edit the bash config file.
echo '[[ -s "$HOME/.rvm/scripts/rvm" ]] && source "$HOME/.rvm/scripts/rvm"' >> ~/.bashrc
Now, close and open the terminal again. Or you can get the same effect by this command:
. ~/.bashrc
To check RVM is installed and to read the notes, you can execute:
$ rvm notes

Step 6: Install packages required for Ruby
After RVM is installed, its time to install Ruby. But you need to make sure we have all the packages that are required by Ruby (it's better to install all these packages now and avoid a headache later on!).

To check what the requirements are, you can execute:
$ rvm requirements
There should be quite some packages enlisted. Some of them, if they are already installed, like git and curl, will not be installed again.

To install the packages, execute:
$ sudo aptitude install build-essential openssl libreadline6 libreadline6-dev curl git-core zlib1g zlib1g-dev libssl-dev libyaml-dev libsqlite3-dev sqlite3 libxml2-dev libxslt-dev autoconf libc6-dev ncurses-dev automake libtool bison

Step 7: Install Ruby (1.9.3 in this case)
With all preparations done now, we can go ahead to install Ruby. I used version 1.9.3.
$ rvm install 1.9.3
This should install Ruby just fine. If you have multiple versions of Ruby on your machine, you can make use this version by:
$ rvm use 1.9.3
, or even better, make this version as default:
$ rvm --default use 1.9.3
Check which version of Ruby you are using by,
$ rvm -v

Step 8: Install Rails
Time to install Rails now. This is the main application framework, one that changed the world to an extent! ;)

To install rails, we will use gems, the standard package manager for Ruby. You do not need to use sudo for installing gems.
$ gem install rails -v 3.2.3
Check the version of rails that was just installed.
$ rails -v
Congratulations, your installation is done. You can try out now creating a new Rails project.

Step 9: Create a new Rails project
Lets create a new Rails project. My site is called "hellosite".
$ rails new hellosite
This should start the bundler, that is responsible for managing application's dependencies. In case, the bundler doesn't start, you can go to the directory of the project (in our case "hellosite") and run the bundler.
$ cd hellosite

$bundle install
Go to the project's directory and you should see the project created with all different folders e.g. models and controllers and views....we will talk about them in some other post! ;)

Step 10: Start the Rails server
$ rails server
This command will start the default Rails server called WEBrick.

In case, you get an error like "ExecJS::RuntimeUnavailable", you need to get some packages installed:
$ gem 'execjs'

$ gem 'therubyracer'
Then go to the project directory and run the bundler again.
$ bundle install
and then start the Rails server using,
$rails server
The WEBrick server runs on port 3000 by default. Once the server is started, you can open your favorite browser, type "http://localhost:3000" and your site should open. There you go, you first Rails project is online! ;)

Eh, btw, the server is still running. To stop the server, press Ctrl+C! ;)

I will follow with more posts on this. But an important disclaimer before I close, trying out these commands on your machine should be done at your risk and do not hold me responsible if anything goes wrong. I had these two handly references that made my task easy, and these references have more comprehensive info. You can also refer to Ryan Bigg's installation guide or get the pdf from Mircea Goia's post for more.

Monday, March 5, 2012

Install Windows 8 Consumer Preview on Oracle VirtualBox

With Microsoft releasing Windows 8 Consumer Preview at MWC in Barcelona a few days back, I could not wait to give it a try. And as you might have expected, my best bet is to get it installed on Oracle VM VirtualBox. So, lets get started.

If you do not have the VirtualBox installed, you can get it from here. I have Oracle VM VirtualBox version 4.1.8 on my machine. Next, I have downloaded the consumer preview of Windows 8 from here, and you should choose the one that suits your machine. I got the 32 bit one. Now, we are ready to go.

Creating a new virtual machine
The first step is to create a new virtual machine for Windows 8. Click on the obvious New button and the wizard starts.


Follow the wizard, where you need to specify a name for the virtual machine and allocate the memory size (minimum 1 GB suggested). Then it asks for creating the virtual hard disk. Choose "create new hard disk". In the following screen choose the file extension as VHD.


You can either choose the memory to be dynamically allocated or keep it fixed size and then choose the recommended disk space. Keeping the default option of 20 GB is fine, if you have that much to spare. The wizard should then create the virtual machine.

Note: After the machine is created, you have to go to Settings > System > Processor and check the option "Enable PAE/NX". Skipping this step might result in error "Your PC needs to be repaired" when installing the OS.

Installing Windows 8 Consumer Preview

Now, we can start with the installation of Windows 8 using the .iso file we downloaded form the link above. Start the Windows 8 virtual machine and it displays the First Run wizard.Specify the path of the .iso as installation media and let the installation begin. The rest of the installation is pretty straight forward, if you have installed Windows before.

The product key for the installation can be found at the same link mentioned above from where the .iso file was downloaded (DNJXJ-7XBW8-2378T-X22TX-BKG7J).

Because it is just a preview, you have limited options to play around with. When the installation asks for it, don't forget to create a Microsoft account. You will need it to access multiple features later on. When the installation is done, you are greeted by the new start screen.


Lot of things have changed, and I have to get into a habit with this OS. But there are two obvious things that I can already share: Windows 8 clearly looks like an OS targeted primarily for tablets and touchscreens, and the preview is not clean and the finishing touch are missing (well, that's why it's a preview).

Now off to play around with it, and wait for another post I would write if this preview really falls worth of it. So, before signing off, a quick tip: you can click the Windows logo button to get the start screen back at any point of time!

Saturday, June 4, 2011

ASP.NET MVC Framework

This is the first post of ASP.NET MVC series, as promised a while earlier. There is enough information on the Internet already by now, that ASP.NET MVC 3 is already released. The posts will contain links to the required sites and of course a step by step guide to develop applications using MVC.

ASP.NET MVC Framework site is the central place where (mostly) all the information regarding installing and using MVC framework is available. The current release MVC3 can also be downloaded from here.

What is MVC? MVC stands for Model-View-Controller. In my earlier posts on framework, I detailed the 3-tiered architecture of software development and explained the service-oriented concepts too. MVC is a different story altogether. It is a new way to developing applications, but a better way than the rest. I personally, like MVC the most (since I read about it in the the Design Patterns book by Erich Gamma and team although it was a short introduction in SmallTalk there). In MVC pattern, there are obvious three components (call them layers):
  1. Models are components of application that maintain state. Think of them as a combination of data access layer that provides data from the server to the interface and stores them back and business logic layer consisting of some business logic to manipulate data.
  2. Views are components of application that display the user interface. Think of them as the presentation layer consisting HTML output renders.
  3. Controllers are components of application that handle events and act as the communication bridge between Models and Views. They are responsible of handling user interaction and resulting in rendered views.
Although, I tried to relate these layers to the 3-tiered architecture, to help those familiar with 3-tiered pattern to correlate, there is a huge difference in practice. To understand MVC, however, one must keep aside the other classic patterns that I discussed earlier aside. MVC is a new adventure.

To start with, you need to have the usual Visual Studio development environment. Get Visual Studio Express and SQL Server 2008 Express for the experiments, if you do not have them already. MVC is not going to change anything existing. The code will be written in C# or VB.NET, the ASPX, ASCX and master pages will remain; so nothing scary. MVC is an addition to the already charming bouquet of development tools and frameworks Microsoft provides. And by far it is the best (personal opinion).

Install MVC from the ASP.NET MVC site. To install MVC 2, .NET Framework 3.5 is required and for MVC 3, .NET Framework 4.0 is required.


Once the MVC framework is installed, a new project templates are installed, that can be used to develop MVC applications. For this post, I will choose MVC 2 template (and not choosing the option to create unit test project for now). In next posts, I will discuss MVC 3 and Razor view as well. On choosing the MVC 2 template, Visual Studio creates a solution with the project. What we notice is that a few files are already existing in the project.

Note the folders Controllers, Models and Views. As described above, these three folders contain their respective classes, i.e. all controller classes are placed in Controllers folder and so on. When the project is run, it opens the home page. But this should come as a surprise and a question to many who are new to MVC. First, there is no default.aspx page. Second, the Index.aspx page is inside Views folder, not in the root directory. How is the page even fetched? And why does not the URL show the page name that is being called!

Welcome to the first MVC culture shock! I said earlier, MVC is a completely new adventure. The most important thing to notice in MVC is that the URL does not map to a physical file (e.g. an aspx page). Instead, the URL maps to a controller class. So instead of a URL like http://localhost/Library/Book.aspx which would open the Book.aspx file, the URL in MVC looks like http://localhost/Library/Book and it maps to BookController class. We will talk about URL mapping again later.

Now, about the question on how does the server know which page to open as the default page. The secret lies in Global.asax file.
public static void RegisterRoutes(RouteCollection routes)
        {
            routes.IgnoreRoute("{resource}.axd/{*pathInfo}");

            routes.MapRoute(
                "Default", // Route name
                "{controller}/{action}/{id}", // URL with parameters
                new { controller = "Home", action = "Index", id = UrlParameter.Optional } // Parameter defaults
            );

        }
The Global.asax.cs file has a method named RegisterRoutes. This is the location where the URL mapping is listed out. We will talk about routes again when we talk about URL routing, but for now, refer the section where a MapRoute method is called mentioning the Default route should be the "Home" controller and the action (the view action) should be Index. This is why the first time the site runs, the HomeController class is called and its method Index is called (since action was specified as Index). The Index action actually returns a type ActionResult which is nothing but a view named Index which should exists in Views/Home/Index.aspx. This should give a glimpse on how the folders are structured.

To summarize, the Controllers are the entry point of an application. The URL maps to a Controller class. A controller class contains action methods. For each controller, a folder is created in Views folder and in this folder, the views for each action specified is placed. So, if HomeController class has two action Index and About, the folder Views/Home should contain Index.aspx and About.aspx. If the URL provides an action to be called, then the specific action of the controller is called, otherwise the Index action is called by default. So a typical URL would be of the following format:

/Controller/Action/Parameters

Lets try this by creating a new controller. To add a new controller, right click on Controllers folder in solution explorer and choose Add > Controller. A new controller class is added.
namespace Library.Controllers
{
    public class BookController : Controller
    {
        //
        // GET: /Book/

        public ActionResult Index()
        {
            return View();
        }
    }
}
Notice a few things. The controllers belong to the ProjectName.Controllers namespace by default. Each controller class inherits from the Controller base class. And an action Index is added by default.

The controller gets data from Model and feeds it to the View. So, lets add a model class. Right click on Models folder in solution explorer and choose "Add > Class". Notice the namespace Projectname.Models.
namespace Library.Models
{
    public class Book
    {
        public int bookID;
        public string bookName;
        public string authorName;

        public Book(int ID, string name, string author)
        {
            bookID = ID;
            bookName = name;
            authorName = author;
        }
    }
        
    public class BookCollection
    {
        List<Book> booksCollection = new List<Book> { };

        public void AddBook(int bookID, string bookName, string author)
        {
            booksCollection.Add(new Book(bookID, bookName, author));
        }

        public List<Book> List()
        {
            return booksCollection;
        }
    }
}
Let me explain what we have here. In the namespace Library.Models (where Library is my project name), I have created two classes: Book and BooksCollection. The Book class is a simple entity structure holder with a constructor. The BookCollection class has methods to add books to a local list and to return the list. To start with, we have no books! ;).

For this example (since we do not have a database), I will fill the data through controller. Practically, data should flow from database into model and then controller should pass the model to view. So now our Index method in BookController class should be like:
public ActionResult Index()
{
    Models.BookCollection books = new Models.BookCollection();

    books.AddBook(1, "Five point someone", "Chetan Bhagat");
    books.AddBook(2, "2 states", "Chetan Bhagat");
            
    return View(books);
}
Simple enough. The model is populated with two book details and passed to the view. Now, lets add a view for the Index action. The easiest way to do this is to right click on the Index method in the code window of HomeController class and choose "Add view", choosing the default master page for now. A folder for the new controller is added in Views folder and an Index.aspx file is created. Lets use the message to display it in the content section.
<%@ Page Title="" Language="C#" MasterPageFile="~/Views/Shared/Site.Master" Inherits="System.Web.Mvc.ViewPage<Library.Models.BookCollection>" %>

<asp:Content ID="Content1" ContentPlaceHolderID="TitleContent" runat="server">
 Index
</asp:Content>

<asp:Content ID="Content2" ContentPlaceHolderID="MainContent" runat="server">

    <h2>Book List</h2>

    <div>
        <% foreach (Library.Models.Book book in Model.List())
            { %>
            <li><%: book.bookID.ToString() + ": \"" + book.bookName + "\" by " + book.authorName + "." %></li>
        <% } %>
    </div>

</asp:Content>
Notice in the page directive that I used Library.Models.BookCollection to be the model that the view will be dealing with. (so now a reference to Model in the view page refers to BookCollection model instance passed from controller).

Run the project and use the URL http://localhost:[port]/Library/Book to invoke the BookController's default Index action. There you go! A simple example to use Model-View-Controller.

Lets look at few noticeworthy points before I close this post. The controller class imports from "System.Web.Mvc" which is important because this is the namespace that contains classes to support MVC framework. e.g. ViewData is a dictionary object that is defined in this namespace.Also, the use of "<%:" is new in the view page. This syntax was introduced in .NET framework 4 and it encodes the HTML output before it is sent to output buffer, in contrast to "<%=" that did not encode the HTML before buffering the output.

Keeping it simple for the first post, I will close it here today. ASP.NET MVC has matured and is in its 3rd version now. And there is lots can be done with MVC that I will post subsequently.

Saturday, April 16, 2011

Code Metrics

Well, back again. Microsoft has been using FxCop for its own code analysis purposes for long. With Visual Studio 2008, the code analysis rules were integrated into the IDE itself under the new "Analyze" menu. I will leave static code analysis for some other day. Right now, I am interested in the "Code Metrics" option under Analyze.

Code metrics is a set of measures that helps you to analyze your code and indicates the complexity or maintainability of the code. There are a number of measures out there that you can use to analyze our code. Microsoft uses the best few and provides statistics about your code. Visual Studio provides you statistics on the lines of code, class coupling, depth of inheritance and most importantly, the cyclomatic complexity. Open a project in Visual Studio, go to "Analyze" and select "Calculate Code Metrics..." option.


When the code metrics is calculated for the project, the results are displayed in a window. The result window contains the metrics for each and each of their methods (functions).

 
Against each class/method, what we can see is a numeric value as Maintainability Index, Cyclomatic Complexity, Depth of Inheritance, Class Coupling and Lines of Code. So what these terms really mean?

  • Cyclomatic Complexity
                  Cyclomatic complexity is defined at the method level. It indicates the structural complexity of the method. The cyclomatic complexity of a method is the count of the total number of independent paths in the method. So, each branch (if, else, select etc.) and each loop (for, while etc.) counts towards the cyclomatic complexity of the method. The more number of branches and loops within a method, the higher the complexity. The cyclomatic complexity of a method has a direct impact on the maintainability and testability of the code, and it has been one of the successful and useful measures of code complexity.

                 The following table explains the range of values and the associated risk.

Cyclomatic Complexity Risk Evaluation
1-10 simple module, not risky
11-20 moderately complex, moderate risk
21-50 complex method, high risk
>50 a very complex and unstable method, very high risk

Further details on how to calculate cyclomatic complexity can be found here.

  • Depth of Inheritance
                 The depth of inheritance is defined at the class level. It is the number of classes that the current class extends till the root of the class hierarchy. The deeper the hierarchy, he higher is the complexity of code.

                 A class hierarchy up to depth 6 is acceptable. Anything higher should be subjected to a revision of the class hierarchy.

  • Class Coupling
                 Class Coupling is defined at the class level. It is the number of classes the current class is coupled with (interacts with). The interaction can be in any form e.g. function calls, returning parameters etc. A class is considered more stable if it is less coupled (i.e. it is more cohesive in nature). Less coupling means there are lesser chances of the class breaking other classes or getting broken by a change in other classes.

                 Although it highly depends on the design and architecture followed, a coupling indicator above 30-40 should be subjected to revision.

  • Lines of Code
                 Lines of code indicate the number of lines of code in a method or a class. Visual Studio counts the number of lines in the IL code and can differ from the lines of code in the source file. This is an old measure of code complexity and can be highly misleading. However, it must be accepted that a method or a class of a huge size is not easily maintainable.

                 While there is no hard and fast rule on the range of lines of code a method or a class should have, it is advised to limit a method below 60 lines of code and a class below 1500 lines of code.

  • Maintainability Index
                 Maintainability Index is a calculated measure based on the above measures that Visual Studio uses to indicate whether method or a class is maintainable. Maintainability Index per module is calculated using the following formula:

Maintainbility Index = 171 - 5.2 * avg (Halstead Volume) - 0.23 * (Cyclomatic Complexity) - 16.2 * avg(Lines of Code)

, where Halstead volume is a measure calculated from the number of operators and operands in the module.

                 A module is considered maintainable if its maintainability index is in a higher range. The index is calculated in a range of 0-100, where 0 being the least maintainable and 100 being the most maintainable. The following table explains the range of values and their meaning.

Maintainability Index Maintainability of Code
20-100 Code is very maintainable (indicated as green)
10-19 Code is moderately maintainable (indicated as yellow)
0-9 Code has poor maintainability (indicated as red)

Although an index above 20 is considered maintainable, it is advised to keep the maintainability index higher than 50 for well maintainable code.

Code metrics is is available only in Visual Studio Team System editions, not in Professional or Standard Editions. However, there are other utilities available including the command line based Code Metrics PowerTool from Microsoft itself that can serve the purpose if you do not have the Team System editions. I will write another post on how to use the PowerTool, but hope this post helps you to understand and get familiar with code metrics in Visual Studio.

Sunday, October 3, 2010

WebP on Google Code

Right now, I am looking at WebP, a new image format that is set as a competitor to JPEG format which is so widely on the web. We know JPEG is a lossy compression that tends to reproduce image as close as the original, and due to its ability to render closer to original images in less number of bytes, it is the widely used image (compression) format. According to Google, they tried to reproduce an image with WebP and found that the file size reduced by upto 40%, keeping the image quality same. Now, to replace JPEG by WebP is a Herculean task and several attempts failed, it is not very clear how far Google is ready to push it forward and how successful they will be (someone in the backyard is screaming, ask Paul...Paul, who? eh...the Octopus!...damn, I too made almost all predictions correct...no media coverage here :-( ).

Check the Google Code page on WebP and the CNET news I came across. Will keep posting if I found anything more. Don't forget to check the gallery of comparisons.

Wednesday, September 8, 2010

Keyboard shortcuts poster

Just found that the team at Microsoft has published a printable list of keyboard shortcuts for Visual Studio 2010. I have downloaded my copy for C#, and it will be on my desk by the morning. Don't doubt, this is a must have no matter how much time you spend with Visual Studio IDE.

You can download them here. Choose the file and format for your favorite language.

If you are using Visual Studio 2008 and missed the poster, you can download the keyboard shortcuts poster for C# here and VB here. Don't miss it!

Tuesday, September 7, 2010

Null-coalescing operator in C#

This is the first time I seriously took an opportunity to look at null-coalescing operator in C#. Introduced in C# 2.0, this is one cool operator that I have hardly put into practice. Well, until now but not anymore. :)

Null-coalescing operator is used to define a default value for nullable types as well as reference types. Let's look at an example.
loginName = loginName ?? "guest";
What we are doing here is using the null-coalescing operator to check whether "loginName" is null. If it is null, the default value "guest" is assigned to it. This could have been done otherwise using a if-else block:
if(loginName == null)
   loginName = "guest";
, or even using a ternary operator:
loginName = (loginName == null) ? "guest" : loginName;
But isn't the null-coalescing operator more sweeter version! In case of strings, I would advise you to use IsNullOrEmpty or IsNullOrWhitespace methods of string class. One way to make sure you get a trimmed login name, you could use a combination as above:
loginName = (string.IsNullOrWhiteSpace(loginName) ? null : loginName.Trim()) ?? "guest";
One more example can be when you need to know if a connection is initialized yet or not. And if not, initialize with the default connection string.
conn = conn ?? new SqlConnection(defaultConnectionString);
Lets look at one more example. Consider a method that sets an Employee status to active. The method also makes sure that if it is passed a reference to an employee not initialized yet, it creates a new active employee and returns it.
public Employee SetEmployeeActive(Employee emp)
{
    //if employee object is not initialized yet, initialize it
    emp = emp ?? (new Employee());
    emp.IsActive = true;

    return emp;
}
Happy null-coalescing!

Sunday, June 20, 2010

Consuming Web Services

This is a continuation from the post on Web Services. To read the first part, click here.

In the last post, I introduced Web Services to you. We created a service named ForexService that has one operation that accepts two input currencies as strings and returns the exchange rate as double.

To consume the web service, let’s create a separate application (note that it can be any type of application, windows or web). This application will act as a client. Here you need to add a web reference (right click on the project in solution explorer and say add web reference) in your client application for the service (in our case, I can use the HTTP URL http://localhost/Forex/ForexService.asmx because I created the web service on HTTP). You can experiment on different ways to add web reference.

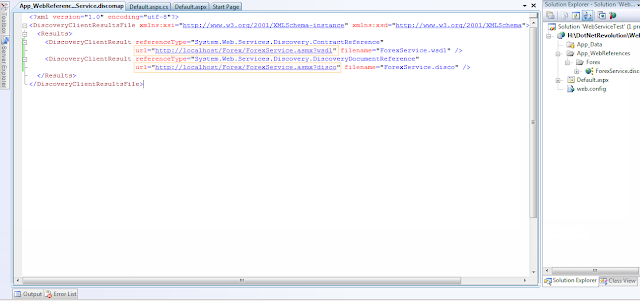
When you add a web reference, a .discomap file is added to your solution. I named the reference to service as Forex and my file looks like:


What is important to notice in this file is the two DiscoveryClientResult details:
  • System.Web.Services.Discovery.ContractReference 
  • System.Web.Services.Discovery.DiscoveryDocumentReference
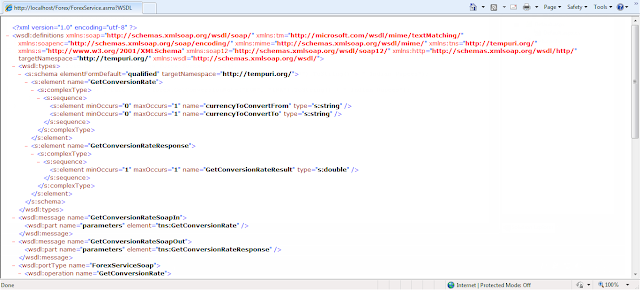
The ContractReference url is http://localhost/Forex/Service.asmx?wsdl. This is the URL of the contract that the host puts forward for every client that wants to consume the service provided by the host. Now what is a contract? We mentioned about some restrictions when I was explaining our Forex requirement scenario earlier, remember? A contract is a document that is published to the client whenever the client requests for a service. The contract document lists all details about the service e.g. name and location of the service, list of operations available in the service, the in and out message requirements for communication, port types and so on. Every client must send a request exactly as described in the contract document, otherwise the service will not be rendered. In our example, the Forex webservice extends only one operation, namely GetConversionRate. If you try the URL in a browser, you will be shown details as below. Btw, to explain it further, WSDL stands for Web Service Description Language. That explains it all!


In fact, when we created the service and run it, it displayed us the list of available operations, remember? In the same screen, there is a link on top as Service Description.  If you had tried the link, you must have visited the WSDL file already for our service.

The DiscoveryDocumentReference url is http://localhost/Forex/Service.asmx?disco. It contains details on where the service can be found. Try the URL in browser.

Now that the web reference is added, my client application can consume the web service. Here is a code snippet from the client application:
public partial class _Default : System.Web.UI.Page 
{
   protected void Page_Load(object sender, EventArgs e)
   {
     Forex.ForexService forex = new Forex.ForexService();
     Response.WriteLine("1 US Dollar = " + forex.GetConversionRate("USD", "INR").ToString() + " Indian Rupees");
     Response.WriteLine("1 Euro = " + forex.GetConversionRate("EUR", "INR").ToString() + " Indian Rupees");
   }
}
The code is easy enough to understand, but to put it in short: we have created an object of the class (the service class) and called the GetConversionRate method. The result will be two lines on the page, something like:

1 US Dollar = 49.2 Indian Rupees
1 Euro = 67.3 Indian Rupees

Let us summarize what we know about web services so far. A web service is a code segment placed on a host (server) that can be invoked by a client using an HTTP URL. The host publishes a contract that defines what operations are available to be invoked by client, what inputs are required and in what format the result can be expected. A client can consume a web service by using the reference to the service and invoking its method.

In our example, we used two strings as input and a double as output. In the next post, I will talk about serialization and using more complex types as parameters.

Introducing Web Services

I talked about WCF in brief in one of my earlier postings, but that brought forward a need for a posting on the basics of web services. So, today I am going to talk about web services at a simpler level using a scenario about foreign exchange rates. I am not talking about forex process and it’s just for example’s sake…so don’t post back saying forex rates are not decided that way! ;-)

The central bank in the country decides the forex rate for every particular day. So let’s say, today the US Dollar to Indian Rupee is 46.01 and Euro to Indian Rupee is 56.99. These rates change every day. There are numerous other websites where these rates are displayed and they need to be updated on a daily basis. It is natural that the owners of these websites will request the Central Bank to provide them some automatic mechanism so that the websites can automatically get themselves updated by the changed rates every day.  If I were the system admin at the Central Bank, what would be my options? Give them a read-only access to a file or a table? Or send them this info every day? Or put the rates on some server, some xml file for them to read?

No convincing solution? What about giving them access to some code that is on my server, but the code will return the rates to them by accessing my database? I have to make sure that they access the code in the most secure way possible. Why not give them an HTTP URL that will access our code and return them some data? Even better, why not put some restriction in code so that the incoming data and outgoing data follow the standards posed by the restrictions? And of course, the best way to receive and send data will be XML!

SOAP stands for Service Oriented Access Protocol.  As it is a protocol, it is a standard in which messages are sent across in XML format. Each SOAP message contains a SOAP envelope that has a SOAP header (optional) and SOAP body. I won’t deviate from topic explaining more about SOAP here, but if you want to get a glance of what SOAP is, you can visit this simple tutorial on W3Schools or SOAP on W3C if you are serious about it. It suffices now to understand that SOAP uses XML as a mode of communication; it is an obvious choice for our scenario. What we now need is some sort of application or code running on our server that can interact using SOAP as the protocol. That is what web services are for. So, web services are applications (chunks of code) that reside on the server (the host) and can be invoked by a client by sending a request.

Web services can be written in any language which is obvious because XML is the mode of communication. The client need not know which language the service is written in as long as the request is accepted in XML and the response is sent in XML. You can create an ASP.NET web service in Visual Studio.


Note that I have not used the file system to create the web service; instead used HTTP since I will be using an HTTP based URL to access the service. The picture below should give you enough insight on the web service created. Note the method GetConversionRate that accepts two strings as currencies and returns the rate as double.


Btw, if the images are not clear, you can always click on them and it will open in its original size.

If you run the solution, you should see the page as below. The page just explains that you have accessed the ForexService web service that has only one operation exposed i.e. GetConversionRate.


Click on the method name GetConversionRate and the screen that follows is worth diving into detail. It gives us a test screen where I can type in the required values and invoke the service. Good enough. Let’s look what is below the test module. You notice the SOAP message formats for both 1.1 and 1.2 versions.


When the client sends a request for service to server, the following message is being sent. The data types in blue and bold will be replaced by the appropriate values. You notice that it has got a soap body in a soap envelope, as I mentioned above. The rest should be pretty understandable.
POST /Forex/ForexService.asmx HTTP/1.1
Host: localhost
Content-Type: application/soap+xml; charset=utf-8
Content-Length: length
<soap12:envelope xmlns:soap12="http://www.w3.org/2003/05/soap-envelope" xmlns:xsd="http://www.w3.org/2001/XMLSchema" xmlns:xsi="http://www.w3.org/2001/XMLSchema-instance">
 <soap12:body>
  <getconversionrate xmlns="http://tempuri.org/">
   <currencytoconvertfrom>string</currencytoconvertfrom>
   <currencytoconvertto>string</currencytoconvertto>
  </getconversionrate>
 </soap12:body>
</soap12:envelope>
Similarly, when the server has received the request and processed it, the result is sent in the following message format. This again has an envelope and a body.
HTTP/1.1 200 OK
Content-Type: application/soap+xml; charset=utf-8
Content-Length: length
<?xml version="1.0" encoding="utf-8"?>
<soap12:Envelope xmlns:xsi="http://www.w3.org/2001/XMLSchema-instance" xmlns:xsd="http://www.w3.org/2001/XMLSchema" xmlns:soap12="http://www.w3.org/2003/05/soap-envelope">
 <soap12:Body>
  <getconversionrateresponse xmlns="http://tempuri.org/">
   <getconversionrateresult>double</GetConversionRateResult>
  </GetConversionRateResponse>
 </soap12:Body>
</soap12:Envelope>
So you see, the message formats used when a client sends a service request to a web service and the server responds to the request is based on the SOAP protocol. Since the communication does not have any language specific restrictions, the client and the server (host) in a Service Oriented Architecture can be in different languages. Wonderful! Cross-language, cross-platform freedom!

Now is the time to see how a client can consume this web service. Check this post.

Saturday, June 12, 2010

Microsoft is going the jQuery way

With jQuery gaining popularity day by day and Microsoft extending support towards it through its Visual Studio IDE, it looks like the future in ASP.NET is going to rely heavily on jQuery. Before I move forward with the integration part which is the actual topic of this blog, let me give you an idea on what jQuery is. If you don't know about jQuery yet or have not followed it recently, you must now. Use of jQuery is getting serious not only with .NET environment but any other environment. To me, it looks like jQuery is going to mean much more in the near future; this I can guess from the increasing number of code examples on the web using jQuery just the way you might have noticed the increasing usage of LINQ.

jQuery is a light weight JavaScript library that is about to change the way you write JavaScript. I have seen people getting addicted to jQuery once they come across it, and why not?...so are its virtues! The latest version of jQuery library is just 24 KB and using just this library in your application, you can do miracles. If you visit the jQuery site, the tag-line says "write less, do more".  And that's true. To use jQuery, all you have to do is visit the jQuery site I gave earlier and download the latest version of the library. If you want it only for use on your website, you can pick the production (minified) version, or if you want to explore it further, you may go for the development version. Once the .js file is downloaded, copy the file to your project folder and start using it by including the file in your source just the way you would include any .js file.

Here is a snapshot where I have used jQuery to display an alert on click of an anchor text. Thios i to give you an idea on how you can use jQuery in Visual Studio. I believe you can carry it forward from here.

How about writing some JavaScript that will fade or slide a <div> when user clicks on it? Just a style change of "display:none" is going to disappear the div...but we want to make it a smooth slide out. You are already thinking of a plethora of code with usage of opacity and setTimeouts, right? But then you also have to put some additional checks to make sure the code is compatible with different browsers!...I know I am scaring you, but now that you have the jQuery library with you, look at what you need to write to get all the above done:
$("div").click(function ()
{
      $(this).hide("slide", { direction: "down" }, 1000);
});
Not only this, what about implementing the complete AJAX based callback in just this much of code:
$(document).ready(function()
{
     $.ajax({
          type: "POST",
          url: "pagemethod.aspx/sayHello",
          contentType: "application/json; charset=utf-8",
          data: "{}",
          dataType: "json",
          success: AjaxSucceeded,
          error: AjaxFailed
    });
});

function AjaxSucceeded(result)
{
    alert(result.d);
}

function AjaxFailed(result) 
{
    alert(result.status + ' ' + result.statusText);
}
That's impressive, isn't it? I am not going to focus on jQuery tutorial here. There are plenty of tutorials available on the web you can access. Best place to start with is the jQuery site's tutorial itself. When I post more articles on jQuery adventure in .NET, I will put some code examples. You can already find some jQuery snippets for Visual Studio in Codeplex that you might want to experiment with once you have done with your basics on jQuery.

What is important to observe how Microsoft is incorporating jQuery into .NET developers' world by extending support to jQuery and even making code contributions to it. In 2008, Scott Gutherie already committed a lot for jQuery from Microsoft in his blog. He mentioned that Microsoft will be shipping jQuery with next version so Visual Studio. In fact, when you create a new web site in Visual Studio 2010, you will find the jQuery files in a scripts folder added by default. I still have to experiment more with it in the 2010 version; will let you know.


Besides, jQuery team has developed a version of jQuery library that is documented as per Microsoft XML comment standards because of which jQuery objects and their properties and methods are now also available in Visual Studio intellisense. You can visit the downloads page on jQuery site and download the Visual Studio version. When you include this documented .js file in your code, the intellisense will guide you through jQuery syntax as you can see below in one of my experiment's screenshot:

This should be possible with Visual Studio 2008 since this IDE has good support for JavaScript. However if you don't have the Service Pack 1 of the IDE, you may face some issues. In that case, get the Service Pack and then refer this knowledge base.

It is pretty sure now that the forthcoming ASP.NET AJAX will be built on jQuery or at least will be largely based on it, make it more important for .NET developers to make jQuery a part of their lives.

A little while ago, Microsoft added jQuery templates and data linking which you can read about here. I will get back to this in some other post with a bit of study. But continuing the effort towards jQuery. Microsoft came up with jQuery Globalization plugin just yesterday. The System.Globalization namespace and CultureInfo class in .NET framework gives you enough liberty to globalize or localize your code. You know how easy it is to convert some date or numeric value into a specific format. For example, I can easily convert my date to English or Dutch format in my server side code as:
using System;
using System.Globalization;
using System.Threading;
public class FormatDate
{
   public static void Main()
   {
      DateTime dt = DateTime.Now;        // Sets the CurrentCulture property to U.S. English.
      Thread.CurrentThread.CurrentCulture = new CultureInfo("en-US");
      Console.WriteLine(dt.ToString("d")); // Creates a CultureInfo for German in Germany.
      CultureInfo ci = new CultureInfo("de-DE");
      Console.WriteLine(dt.ToString("d"));
   }
}
This is just a simple example. In fact, the power of globalization in .NET extends to every datatype and conversion, making it so handy to format our data. Unfortunately, it isn't that easy in JavaScript or the client side code to do the same. This Globalization jQuery plugin is here to solve the same problem, at least making it very very simple. By using language tags, it is not only possible to imitate the CultureInfo scenario but extend the same power into your JavaScript Code. You can read about the plugin here. I will post more as I discover more, but the moral of the story remains: jQuery is here to stay and get more and more involved. If you want to stay afloat, gulp it!